mysql数据库是java web项目开发最常用的数据库之一,对于mysql的操作网上的文章数不胜数,但是对于mysql8的操作却没有多少,甚至有的博客用mysql5.7的操作用于mysql8还写出来,简直坑的不要不要的,我也是深受其害,此篇文章将介绍对于mysql8,从创建数据库,创建用户,赋予权限,授权远程连接,导入,导出数据库多个方面来详细说明。
我被坑的就是远程连接一直通不了,权限都设置的没问题就是通不了,各种尝试,最后看了其他博客,发现少了一条命令,都是说mysql8的操作命令,实则真假难辨啊。
目录
1、连接数据库、创建数据库
用root用户连接数据库,root用户具备数据库最高权限,所以不要把root用户作为远程连接用户使用,数据库安全起见最好建立简单权限的用户作为远程连接用户,这样即使简单用户的密码被泄露了也不会导致所有数据库都出问题
root@ba085c1d01e2:/# mysql -uroot -p
Enter password:
Welcome to the MySQL monitor.  Commands end with ; or \g.
Your MySQL connection id is 8
Server version: 8.0.16 MySQL Community Server - GPL

Copyright (c) 2000, 2019, Oracle and/or its affiliates. All rights reserved.

Oracle is a registered trademark of Oracle Corporation and/or its
affiliates. Other names may be trademarks of their respective
owners.

Type 'help;' or '\h' for help. Type '\c' to clear the current input statement.
#创建数据库
mysql> create database apgtest;
Query OK, 1 row affected (0.00 sec)
#显示所有数据库
mysql> show databases;
+--------------------+
| Database           |
+--------------------+
| apgtest            |
| information_schema |
| mysql              |
| performance_schema |
| sys                |
| test               |
+--------------------+
11 rows in set (0.01 sec)

mysql>
2、创建用户,赋予权限
#创建用户testuser,密码为 testuser
mysql> CREATE USER 'testuser'@'%' IDENTIFIED BY 'testuser';
Query OK, 0 rows affected (0.00 sec)
#赋予数据库apgtest的增删改查权限
mysql> GRANT ALL PRIVILEGES ON apgtest.* TO 'testuser'@'%' WITH GRANT OPTION;
Query OK, 0 rows affected (0.00 sec)
#退出root用户
mysql> exit
Bye
#用testuser用户登录
root@ba085c1d01e2:/# mysql -utestuser -p
Enter password:
Welcome to the MySQL monitor.  Commands end with ; or \g.
Your MySQL connection id is 12
Server version: 8.0.16 MySQL Community Server - GPL

Copyright (c) 2000, 2019, Oracle and/or its affiliates. All rights reserved.

Oracle is a registered trademark of Oracle Corporation and/or its
affiliates. Other names may be trademarks of their respective
owners.

Type 'help;' or '\h' for help. Type '\c' to clear the current input statement.
#查询此用户下的数据库
mysql> show databases;
+--------------------+
| Database           |
+--------------------+
| apgtest            |
| information_schema |
+--------------------+
2 rows in set (0.01 sec)
#切换数据库
mysql> use apgtest;
Database changed
#创建一个表只有ID一列
mysql> create table test(id char(32));
Query OK, 0 rows affected (0.01 sec)
#插入32位的uuid
mysql> insert into test value (replace(uuid(),'-',''));
Query OK, 1 row affected (0.01 sec)
#查询此表数据
mysql> select * from test;
+----------------------------------+
| id                               |
+----------------------------------+
| ad7f8e60fb9811e9880c0242ac180002 |
+----------------------------------+
1 row in set (0.00 sec)

#用户的创建和权限就弄好了,现在考虑怎么让这个用户能被远程连接,也就是第三方mysql连接工具连接
3、赋予用户远程连接
远程连接有两种情况,一种是按章前面的方式走的话,就可以连接上,新创建的用户在被远程连接之前得需要在服务器mysql -utestuser -p 登录一下才能连接,这种情况就会出现一个问题,如果数据库重启再次用远程工具连接就不能正常连接,下面详细说下这个细节。
重启数据库
#先重启数据库 我用的是docker
[root@apg-server ~]# docker restart mysql8
mysql8
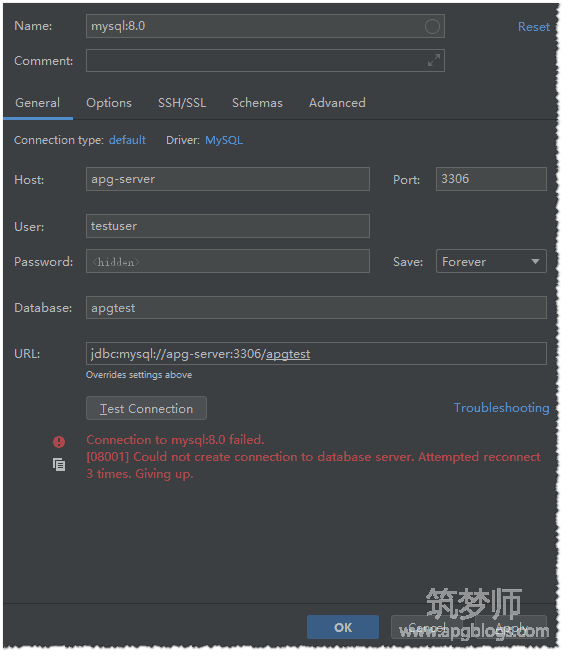
然后用远程工具连接,会看到连接失败。

在服务器用testuser登录数据库
[root@apg-server ~]# docker exec -it mysql8 bash
root@ba085c1d01e2:/# mysql -utestuser -p
Enter password:
Welcome to the MySQL monitor.  Commands end with ; or \g.
Your MySQL connection id is 21
Server version: 8.0.16 MySQL Community Server - GPL

Copyright (c) 2000, 2019, Oracle and/or its affiliates. All rights reserved.

Oracle is a registered trademark of Oracle Corporation and/or its
affiliates. Other names may be trademarks of their respective
owners.

Type 'help;' or '\h' for help. Type '\c' to clear the current input statement.

mysql>
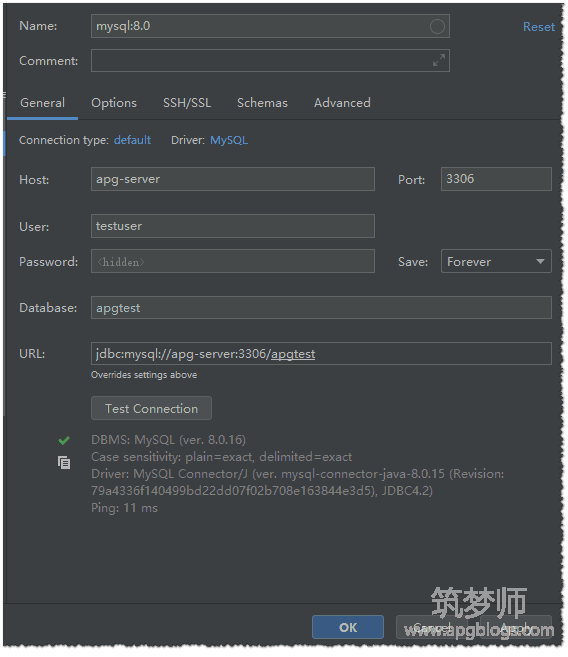
然后在用连接工具连接,会发现就连接成功了,是不是很奇怪。

前面说的就是按照常规方式创建完用户会出现的情况,下面说一下如何杜绝这个情况,这个情况显然不合理,如果数据库重启意味着所有用户都要在服务器重新登录一边,显然多此一举。
下面是具体操作步骤,主要是设置用户密码永不过期,修改远程连接密码
#使用root用户操作
root@ba085c1d01e2:/# mysql -uroot -p
Enter password:
Welcome to the MySQL monitor.  Commands end with ; or \g.
Your MySQL connection id is 24
Server version: 8.0.16 MySQL Community Server - GPL

Copyright (c) 2000, 2019, Oracle and/or its affiliates. All rights reserved.

Oracle is a registered trademark of Oracle Corporation and/or its
affiliates. Other names may be trademarks of their respective
owners.

Type 'help;' or '\h' for help. Type '\c' to clear the current input statement.
#将testuser密码设置为永不过期
mysql> ALTER USER 'testuser'@'%' IDENTIFIED BY 'testuser' PASSWORD EXPIRE NEVER;
Query OK, 0 rows affected (0.00 sec)
#修改testuser远程连接密码跟原密码一样
mysql> ALTER USER 'testuser'@'%' IDENTIFIED WITH mysql_native_password BY 'testuser';
Query OK, 0 rows affected (0.00 sec)

mysql>
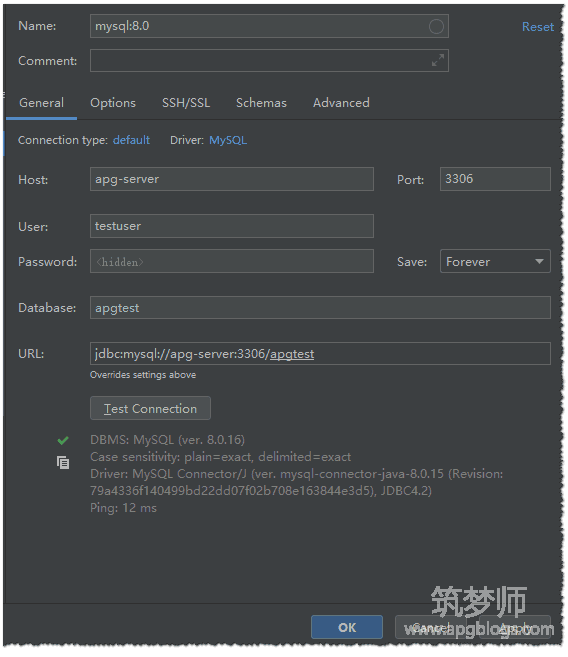
这时候重启数据库,不在服务器登录的情况下用远程工具测试,发现就可以顺利连接了,再也不用在服务器先登陆一遍了。

4、导入、导出数据库
数据库的导入导出也比较简单,之前用testuser创建了一个test表,用mysqldump命令将apgtest整个表进行备份
#执行导出命令 箭头后面就是要存放的sql文件名 当前是存放在根目录下面
root@ba085c1d01e2:/# mysqldump -utestuser -p apgtest > apgtest_bk.sql
Enter password:
root@ba085c1d01e2:/# ls
apgtest_bk.sql  bin	boot  dev  docker-entrypoint-initdb.d  entrypoint.sh  etc  home  lib  lib64  media  mnt  opt  proc  root  run  sbin  srv  sys  tmp  usr  var
#也可以导出远程数据库
mysqldump -h 192.168.22.22 -u testuser -p apgtest>apgtest_bk.sql
#导入数据库,导入数据库之前先创建一个新的数据库,创建数据库看之前操作即可
mysql -utestuser -p apgtest < apgtest_bk.sql
导出的apgtest的sql文件示例
这里面的“a”表是我创建测试的,没有影响
-- MySQL dump 10.13  Distrib 8.0.16, for Linux (x86_64)
--
-- Host: localhost    Database: apgtest
-- ------------------------------------------------------
-- Server version 8.0.16

/*!40101 SET @OLD_CHARACTER_SET_CLIENT=@@CHARACTER_SET_CLIENT */;
/*!40101 SET @OLD_CHARACTER_SET_RESULTS=@@CHARACTER_SET_RESULTS */;
/*!40101 SET @OLD_COLLATION_CONNECTION=@@COLLATION_CONNECTION */;
 SET NAMES utf8mb4 ;
/*!40103 SET @OLD_TIME_ZONE=@@TIME_ZONE */;
/*!40103 SET TIME_ZONE='+00:00' */;
/*!40014 SET @OLD_UNIQUE_CHECKS=@@UNIQUE_CHECKS, UNIQUE_CHECKS=0 */;
/*!40014 SET @OLD_FOREIGN_KEY_CHECKS=@@FOREIGN_KEY_CHECKS, FOREIGN_KEY_CHECKS=0 */;
/*!40101 SET @OLD_SQL_MODE=@@SQL_MODE, SQL_MODE='NO_AUTO_VALUE_ON_ZERO' */;
/*!40111 SET @OLD_SQL_NOTES=@@SQL_NOTES, SQL_NOTES=0 */;

--
-- Table structure for table `a`
--

DROP TABLE IF EXISTS `a`;
/*!40101 SET @saved_cs_client     = @@character_set_client */;
 SET character_set_client = utf8mb4 ;
CREATE TABLE `a` (
  `id` int(11) DEFAULT NULL
) ENGINE=InnoDB DEFAULT CHARSET=utf8mb4 COLLATE=utf8mb4_0900_ai_ci;
/*!40101 SET character_set_client = @saved_cs_client */;

--
-- Dumping data for table `a`
--

LOCK TABLES `a` WRITE;
/*!40000 ALTER TABLE `a` DISABLE KEYS */;
INSERT INTO `a` VALUES (1);
/*!40000 ALTER TABLE `a` ENABLE KEYS */;
UNLOCK TABLES;

--
-- Table structure for table `test`
--

DROP TABLE IF EXISTS `test`;
/*!40101 SET @saved_cs_client     = @@character_set_client */;
 SET character_set_client = utf8mb4 ;
CREATE TABLE `test` (
  `id` char(32) DEFAULT NULL
) ENGINE=InnoDB DEFAULT CHARSET=utf8mb4 COLLATE=utf8mb4_0900_ai_ci;
/*!40101 SET character_set_client = @saved_cs_client */;

--
-- Dumping data for table `test`
--

LOCK TABLES `test` WRITE;
/*!40000 ALTER TABLE `test` DISABLE KEYS */;
INSERT INTO `test` VALUES ('ad7f8e60fb9811e9880c0242ac180002');
/*!40000 ALTER TABLE `test` ENABLE KEYS */;
UNLOCK TABLES;
/*!40103 SET TIME_ZONE=@OLD_TIME_ZONE */;

/*!40101 SET SQL_MODE=@OLD_SQL_MODE */;
/*!40014 SET FOREIGN_KEY_CHECKS=@OLD_FOREIGN_KEY_CHECKS */;
/*!40014 SET UNIQUE_CHECKS=@OLD_UNIQUE_CHECKS */;
/*!40101 SET CHARACTER_SET_CLIENT=@OLD_CHARACTER_SET_CLIENT */;
/*!40101 SET CHARACTER_SET_RESULTS=@OLD_CHARACTER_SET_RESULTS */;
/*!40101 SET COLLATION_CONNECTION=@OLD_COLLATION_CONNECTION */;
/*!40111 SET SQL_NOTES=@OLD_SQL_NOTES */;

-- Dump completed on 2019-10-31  5:10:30
5、远程连接数据库查询数据
用JetBrains公司的datagrid连接mysql查询test表数据结果如下

现在对于mysql数据库常规操作和遇到的问题都做了详细的说明,写出来也是给自己更加一个深刻的记忆,也希望能帮助到码友们。