JMH我也是头次才知道,人家2013年就出来了,作为一个老程序员略感尴尬,一直奔波于项目开发并没有深究技术本身,这次也是在研究多线程锁的时候发现了JMH这个工具, JMH是Java Microbenchmark Harness的简称 ,我们平时写性能测试执行时长都是记录当前时间然后在减去执行完之后的当前时间,以此得出花费时间,这种方式实际上是非常不可靠的,因为java的代码在运行的时候编译器会对语法进行各种优化,而且每次JVM启动的时机都是会影响准确性的,因为进程在操作系统中也是有优先级的,真正的测试应该是在jvm执行的时候准确测试,这时候传统的时间测试就不可行,JMH的诞生就是解决这个问题
一般对代码测试我们会想知道什么呢?比如我这个方法在一秒钟能执行多少次,这个方法有几百人相当于几百个线程并发的时候的执行效率,这个方法一次执行的时间或者每次执行的时间,或者在百分之多少的概率下执行时长,TPS(吞吐量),OPS(每秒可操作次数)等等。
JMH就可以对一个方法的性能做到全方位的测试甚至精确到毫秒,微妙,纳秒级别,也可以用很多个线程去执行这个方法,甚至可以用@State注解对方法添加执行前后的钩子,下面就实际用代码演示以下
目录
一、添加JMH Maven依赖
在pom文件中添加如下依赖,需要注意jmh-generator-annprocess的作用域设置为provided,不然可能会报 Unable to find the resource: /META-INF/BenchmarkList 的错误
<dependency>
            <groupId>org.openjdk.jmh</groupId>
            <artifactId>jmh-core</artifactId>
            <version>1.21</version>
        </dependency>
        <dependency>
            <groupId>org.openjdk.jmh</groupId>
            <artifactId>jmh-generator-annprocess</artifactId>
            <version>1.21</version>
            <scope>provided</scope>
        </dependency>
二、编写简单的JMH测试类
这里写一个最简单的基准性能测试方法,用一个空方法来理解JMH的用法,首先在空方法上加入了@Benchmark注解,此注解表示那个方法用于基准测试。
然后在main方法中用配置项的方式配置基准测试的一些参数,默认的参数因为太大,测试起来比较慢,这里全部改为最小的,可以方便快速测试看结果。
package jmh;

import org.openjdk.jmh.annotations.Benchmark;
import org.openjdk.jmh.runner.Runner;
import org.openjdk.jmh.runner.RunnerException;
import org.openjdk.jmh.runner.options.Options;
import org.openjdk.jmh.runner.options.OptionsBuilder;
import org.openjdk.jmh.runner.options.TimeValue;

/**
 * @author xiaomianyang
 * @description
 * @date 2020-02-27 08:52
 */
public class SimpleBenchmark {

    @Benchmark
    public void testBenchMark(){

    }

    public static void main(String[] args) throws RunnerException {
        Options optionsBuilder=new OptionsBuilder()
                .include(SimpleBenchmark.class.getSimpleName())
                .forks(1) //设置JVM进程启动数量,多个进程可以减少对测试结果的影响
                .warmupIterations(1) //预热次数
                .warmupTime(TimeValue.seconds(1)) //预热时间
                .measurementIterations(1) //基准测试次数
                .measurementTime(TimeValue.seconds(1)) //基准测试时间
                .build();
        new Runner(optionsBuilder).run();
    }

}
观察输出结果
可以看到JMH的一些版本信息以及JVM的一些信息,我们的基准测试配置信息都加了注释说明
# JMH version: 1.21
# VM version: JDK 1.8.0_201, Java HotSpot(TM) 64-Bit Server VM, 25.201-b09
# VM invoker: D:\Program Files\Java\jdk1.8.0_201\jre\bin\java.exe
# VM options: -javaagent:D:\Program Files\IntelliJ IDEA 2018.2.7\lib\idea_rt.jar=2678:D:\Program Files\IntelliJ IDEA 2018.2.7\bin -Dfile.encoding=UTF-8
# Warmup: 1 iterations, 1 s each #预热次数和预热时间
# Measurement: 1 iterations, 1 s each #基准测试次数和时间
# Timeout: 10 min per iteration
# Threads: 1 thread, will synchronize iterations #一个线程同步迭代
# Benchmark mode: Throughput, ops/time #测试模式 吞吐量
# Benchmark: jmh.SimpleBenchmark.testBenchMark #该类的方法用于基准测试

# Run progress: 0.00% complete, ETA 00:00:02
# Fork: 1 of 1
# Warmup Iteration   1: 3720087591.411 ops/s
Iteration   1: 3892608771.297 ops/s


Result "jmh.SimpleBenchmark.testBenchMark":
  3892608771.297 ops/s


# Run complete. Total time: 00:00:03

REMEMBER: The numbers below are just data. To gain reusable insights, you need to follow up on
why the numbers are the way they are. Use profilers (see -prof, -lprof), design factorial
experiments, perform baseline and negative tests that provide experimental control, make sure
the benchmarking environment is safe on JVM/OS/HW level, ask for reviews from the domain experts.
Do not assume the numbers tell you what you want them to tell.

Benchmark                       Mode  Cnt           Score   Error  Units
SimpleBenchmark.testBenchMark  thrpt       3892608771.297          ops/s

#这里就是每次可操作的次数,一秒可以执行testBenchmark方法多少次
Process finished with exit code 0
三、采用注解的方式测试
下面的代码加入了JMH常用的一些注解用于测试,后面有注解的详细解释,这里的代码加了休眠2秒可以更方便呢观察测试结果。
package jmh;

import org.openjdk.jmh.annotations.*;
import org.openjdk.jmh.runner.Runner;
import org.openjdk.jmh.runner.RunnerException;
import org.openjdk.jmh.runner.options.Options;
import org.openjdk.jmh.runner.options.OptionsBuilder;
import java.util.concurrent.TimeUnit;
import java.util.concurrent.atomic.AtomicInteger;

/**
 * @author xiaomianyang
 * @description
 * @date 2020-02-26 09:50
 */
@BenchmarkMode({Mode.Throughput,Mode.AverageTime,Mode.SampleTime,Mode.SingleShotTime})
//@BenchmarkMode({Mode.All})
@OutputTimeUnit(TimeUnit.SECONDS)
public class MyBenchmark {

    static AtomicInteger atomicInteger=new AtomicInteger();

    @Benchmark
    @Fork(value = 0)
    @Warmup(iterations = 5,time = 1)
    @Measurement(iterations = 5,time = 1)
    @Threads(value = 1)
    public void testMethod(TestState testState) throws InterruptedException {
        testState.getInteger().incrementAndGet();
        TimeUnit.MILLISECONDS.sleep(2000);
        atomicInteger.incrementAndGet();
    }

    @State(Scope.Benchmark)
    public static class TestState{

        private AtomicInteger integer;

        @Setup(Level.Trial)
        public void setup(){
            System.out.printf("benchmark前");
        }

        @TearDown(Level.Trial)
        public void tearDown(){
            System.out.printf("benchmark后");
        }

        public AtomicInteger getInteger(){
            return atomicInteger;
        }
    }

    public static void main(String[] args) throws RunnerException {
        Options options=new OptionsBuilder()
                .include(MyBenchmark.class.getSimpleName())
                .build();
        new Runner(options).run();
    }
}
四、JMH注解介绍
| 注解 | 说明 |
| BenchmarkMode | 基准模式 Throughput:吞吐量,每段时间执行的次数 AverageTime:平均耗时,每次执行的平均耗时 SampleTime:采样耗时,随机采样执行时间 SingleShotTime:计算一次的耗时,每次执行中计算耗时 All:所有指标,上面所有项都测试 |
| OutputTimeUnit(TimeUnit.SECONDS) | 输出的时间单位,可以到天以及到纳秒 |
| Benchmark | 要测试的方法 |
| Fork(value = 0) | jvm启动的数量,多个jvm可以更好的测试性能 |
| Warmup(iterations = 5,time = 1) | 预热次数和预热时间 |
| Measurement(iterations = 5,time = 1) | 基准测试次数和测试时间 |
| Threads(value = 1) | 要启动多少个线程 |
| State(Scope.Benchmark) | 做基准测试会用到一些变量或者在执行的某个测试操作时执行我们自定义的代码就可以使用state注解 |
| Setup(Level.Trial) | benchmark方法前执行 Trial:每次基准前执行,一次基准测试包含很多轮 Invocation:调用测试方法前执行,频率很高 Iteration:每轮迭代前执行 |
| TearDown(Level.Trial) | benchmark方法后执行 Trial:每次基准后执行,一次基准测试包含很多轮 Invocation:调用测试方法后执行,频率很高 Iteration:每轮迭代后执行 |
五、输出测试结果
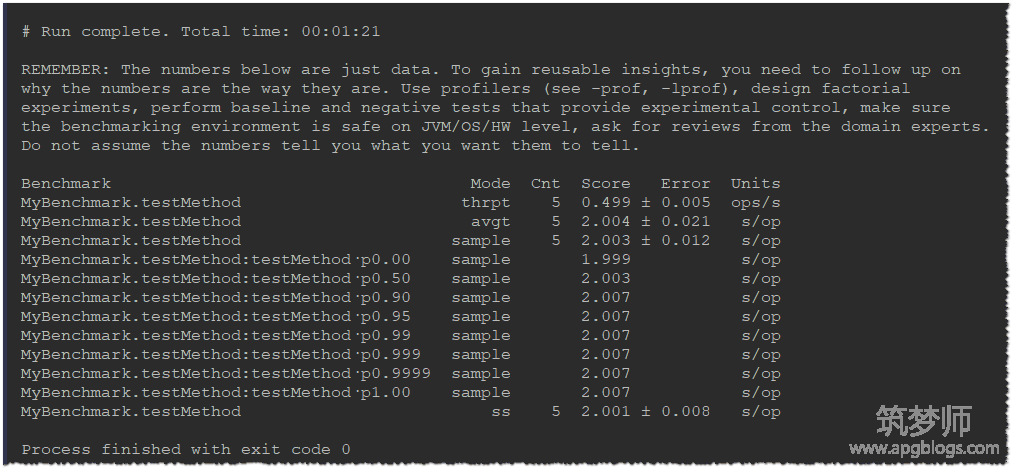
这里截图只看最终的结果,每个模式花费的时间都有说明,第一个是吞吐量,第二个平均时间,中间那些都是在采样百分之多少的时候花费的时间,因为我们休眠了2秒钟,所以大部分都是2秒一次的操作。
当然JMH远不止这些功能,更多高级的用法推荐大家看官方例子
